

.svg)
.svg)
.svg)
Tired of your emails getting lost in spam or never reaching inboxes at all? You’re not alone. Many businesses struggle with email delivery until they discover how simple it is to set up SMTP Settings SendGrid the right way.
Think of it like setting up a strong foundation for your house — if the base isn’t right, everything on top will fall apart. Configuring SendGrid SMTP servers correctly ensures your messages travel safely and reliably, without being blocked or marked as suspicious.
And the best part? It only takes 10 quick steps.
In this article, we’ll walk you through those exact steps to configure SMTP Settings SendGrid with an API key. Each step is explained in plain, simple language so you don’t get stuck.
By the end, you’ll not only have your email setup running smoothly but also understand the best practices to keep your delivery secure and stress-free.
What Are SendGrid SMTP Settings and How Does an SMTP Relay Work?
SMTP settings SendGrid are the details you use to connect your email program or client with SendGrid’s SMTP service. An SMTP relay works like a bridge that moves your messages from one server to another until they reach the right inbox.
Key Components of SendGrid SMTP Settings
When you set up SMTP servers inside your SendGrid account, you need a few basic details. These include the mail server address (smtp.sendgrid.net), the correct ports for TLS connections or SSL, and a login using username and password.
Instead of a normal login, SendGrid requires an API key, which makes the authentication more secure.
Using an SMTP server helps email service providers know that your sending domain and sender authentication are valid. This step is key to avoid spam filters and improve overall email deliverability. Smaller businesses and large companies both use SMTP mail setups to send emails at scale without errors.
Here are the main details you’ll need when setting up:
- Server: smtp.sendgrid.net
- Ports: 25, 465, 587, or 2525 depending on your email client and connection type
- Username: always apikey
- Password: your unique SendGrid API key
- Authentication: TLS or SSL for secure connection
Once you configure these settings, you can send a test email to verify that your messages are being delivered. This process helps confirm that your email header, subject line, and other message details are accepted by the receiving servers.
Domain authentication also plays a big role. It lets email service providers confirm that you own the sending domain, which improves email delivery and builds trust. Without this step, your address could be flagged, and spam filters may block your emails.
Finally, keep in mind that every mail setup needs to be monitored. Logs help you track errors, failed connection attempts, or rejected messages. By checking logs in your SendGrid account, you can quickly fix problems with authentication, ports, or permissions.
This saves time and makes sure your business can continue to send emails reliably.
SMTP Relay VS. Traditional SMTP Server: What's The Difference
SMTP relay and a traditional SMTP server both help send emails, but they work in slightly different ways. Knowing the difference helps you pick the right setup for your business.
In short, an SMTP relay like Twilio SendGrid gives you secure, scalable access to send emails without worrying about server maintenance, while a traditional SMTP server needs more work and offers less flexibility.
Why Configuring Your SMTP Servers Correctly Is Critical for Email Deliverability and Security
Correct settings keep your smtp email flowing, protect your account, and help messages reach the inbox. Good setup reduces blocks, helps deliver on time, and keeps login safe.
1. Misconfigured SMTP Servers Lead to Emails Landing in Spam
When settings are wrong, smtp email can look unsafe to filters. Bad headers, wrong ports, or missing domain checks make servers doubt your message. Fixing setup early will deliver more mail. This makes the article helpful.
- Use a known host and ports.
- Add sender authentication for your sending domain.
- Create clear from and reply addresses.
- Paste the right API key in the password field.
For example, a typo in server host or port makes your client fail to connect. Another example is using one server without TLS, which can flag messages. Create a habit to test and log each change. Create checks that verify the path your mail takes.
If you often send email to new addresses, start warm and slow. Add data like company name in the email header and message to build trust. Create a small test list first, then expand. This keeps smtp email healthy and the article helpful.
2. Poor Authentication Weakens Security and Exposes Your Domain
Without solid authentication, anyone could try to copy your address. Twilio SendGrid's smtp helps prove who you are so servers receive emails with trust. Create proper DNS records and keep your account safe.
- Create and add domain authentication for your sending domain.
- Use an API key, not a basic authentication login.
- Create DKIM and SPF so providers can verify you.
- Keep full access only for admins; limit other users.
For example, using old username and password on one server invites risk. Another example is skipping DNS updates after you create a new domain. Create a plan to review logs weekly. Create alerts to verify changes quickly. This keeps smtp email clean and the article helpful.
Strong setup also protects data in transit. Use TLS to secure the connection and deliver your mail safely. Create a checklist, paste it in your runbook, and share it with the team. Keep full access keys in a safe place and rotate them on a schedule.
3. Incorrect SMTP Relay Settings Can Block or Delay Messages
If relay details are off, messages can stack up. Wrong ports, bad addresses, or throttling issues can cause delay. Create clear rules for send rate so your mail does not hit limits.
- Choose ports that work with your email client and network.
- Create logs that show send, receive, and bounce paths.
- Paste correct host and address details to avoid error.
- Verify connection with a small test email first.
For example, office firewalls can block port 25; try 587 instead. Another example is using stale IP addresses in tools; let the service route traffic. Create timeouts that retry smartly. Create small batches so you deliver in steady waves.
If delay repeats, check the message size and data. Create lighter templates that load fast. Use clear subject line text so users open and respond. This helps mail flow better and makes the article helpful.
4. Using Weak Credentials Instead of an API Key Increases Risk
API keys are safer and easier to rotate than a password. They help you control access by app and client. Create keys per app so you can remove one without stopping all mail.
- Create a key with just what you need; avoid full access unless required.
- Store keys in a safe vault; never paste them in code.
- Verify keys in a test email before go-live.
- Create a rotation plan that fits your business.
For example, share a key only with the system that must send email. Another example is to create read-only keys for tools that only log. Create separate keys for staging and production. Create alerts if a key is used from odd addresses.
If a key leaks, act fast. Revoke it, create a new one, and update your settings. This simple flow can save time and reduce risk while you deliver steady smtp email.
5. Proper SMTP Server Setup Builds Trust and Improves Deliverability
Good setup tells providers your message is safe and real. It helps servers route mail, match addresses, and verify the sender. Create clear steps so any user can follow them.
- Create your account, then create domain records before big sends.
- Paste the API key once, then test and log results.
- Verify that clients can connect and receive emails.
- Create docs so new users can connect fast.
For example, set up Twilio SendGrid's dashboard, then create sender authentication. Another example is to create templates that keep data lean and clear. Create steady send patterns so providers trust your flow. Create small rollouts before big campaigns.
Done right, you send email with fewer blocks and better open rates. Keep your settings tidy, keep your server stable, and deliver clearly. This helps business users reach the inbox and keeps the focus on results.
Follow these 10 Steps to Configure SendGrid SMTP Settings with an API Key
Setting up SendGrid’s smtp settings is simple if you follow each step in order. These steps help you connect, send email safely, and improve deliverability.
1. Log In to Your SendGrid Dashboard
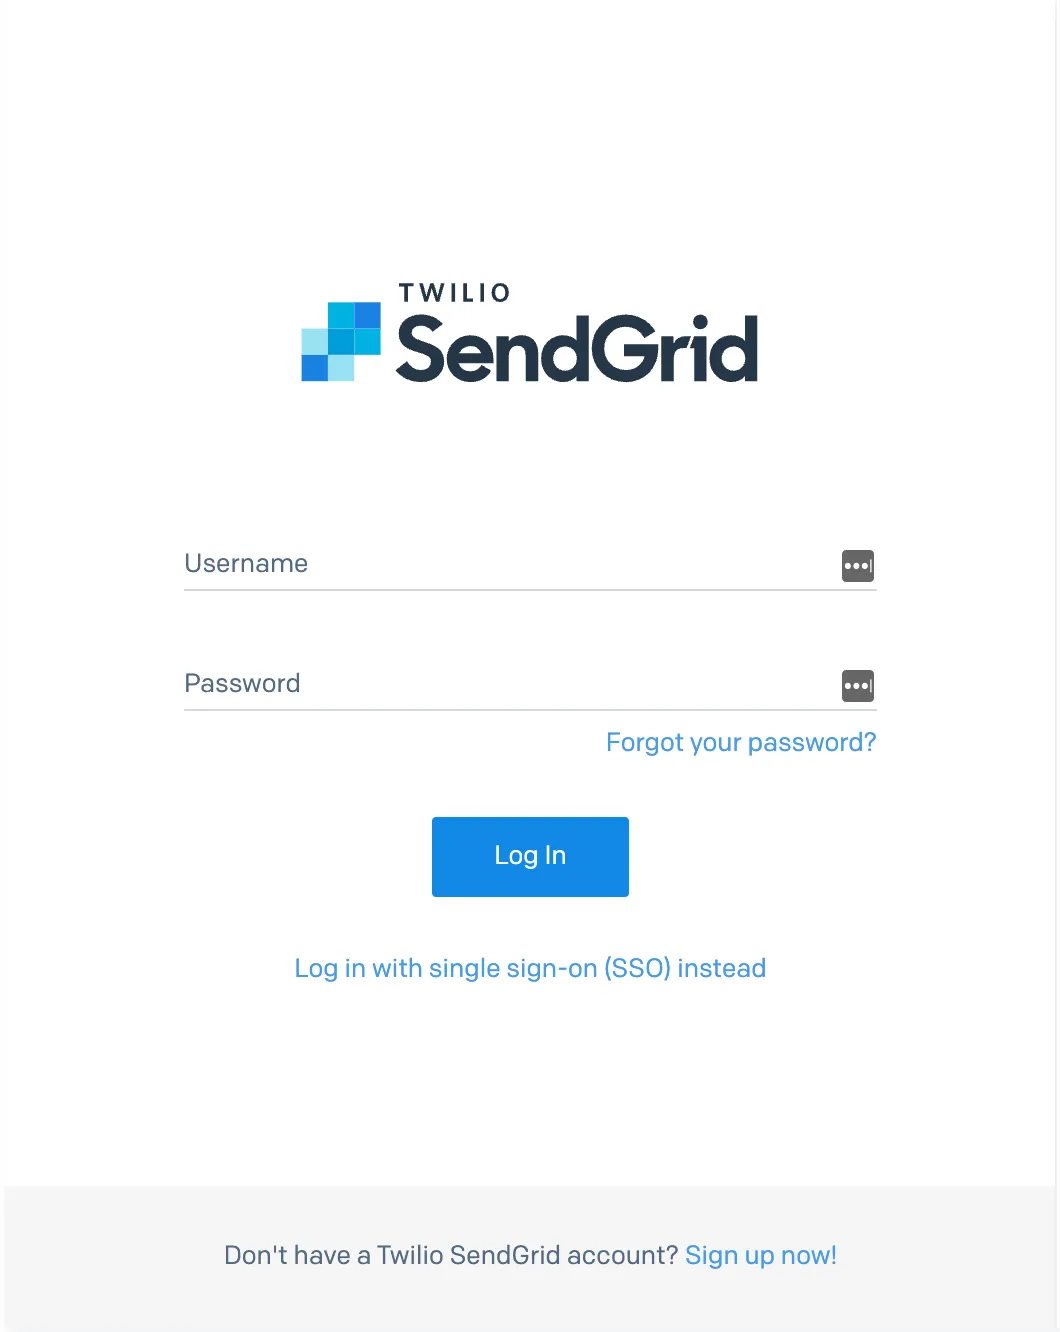
The first step is to log in to your SendGrid account. This is where you will create and manage your smtp email settings.
- Go to the SendGrid login page.
- Use your account username and password.
- Access the dashboard where you can manage settings and permissions.
Once inside, you have full access to create API keys, check logs, and verify email delivery details. Without logging in, you cannot configure or authenticate your mail server.
2. Generate a New API Key with Mail Send Permissions
Next, create a new API key for smtp email. This key works as your password for secure authentication.
- Navigate to Settings > API Keys.
- Click Create API Key.
- Select mail send permissions to allow sending.
Giving only required permissions helps reduce risk. Avoid full access if not needed. Each key can be used for one server, app, or client, which keeps your email program more secure.
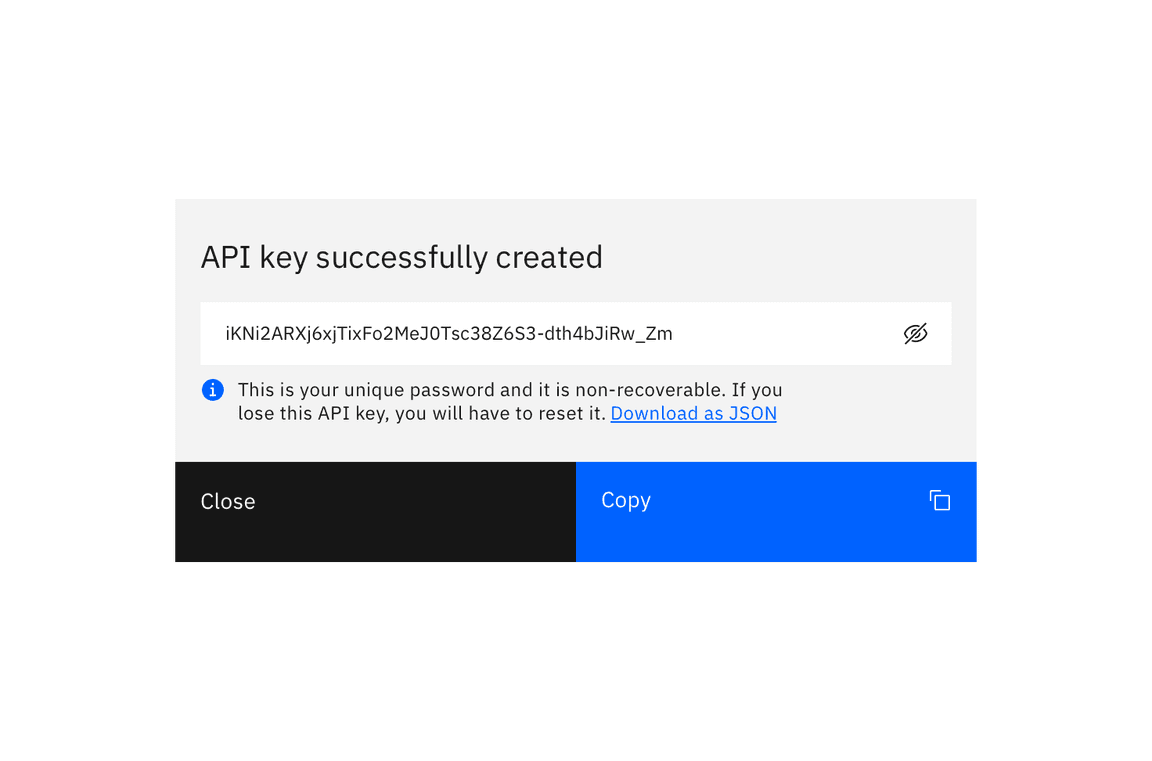
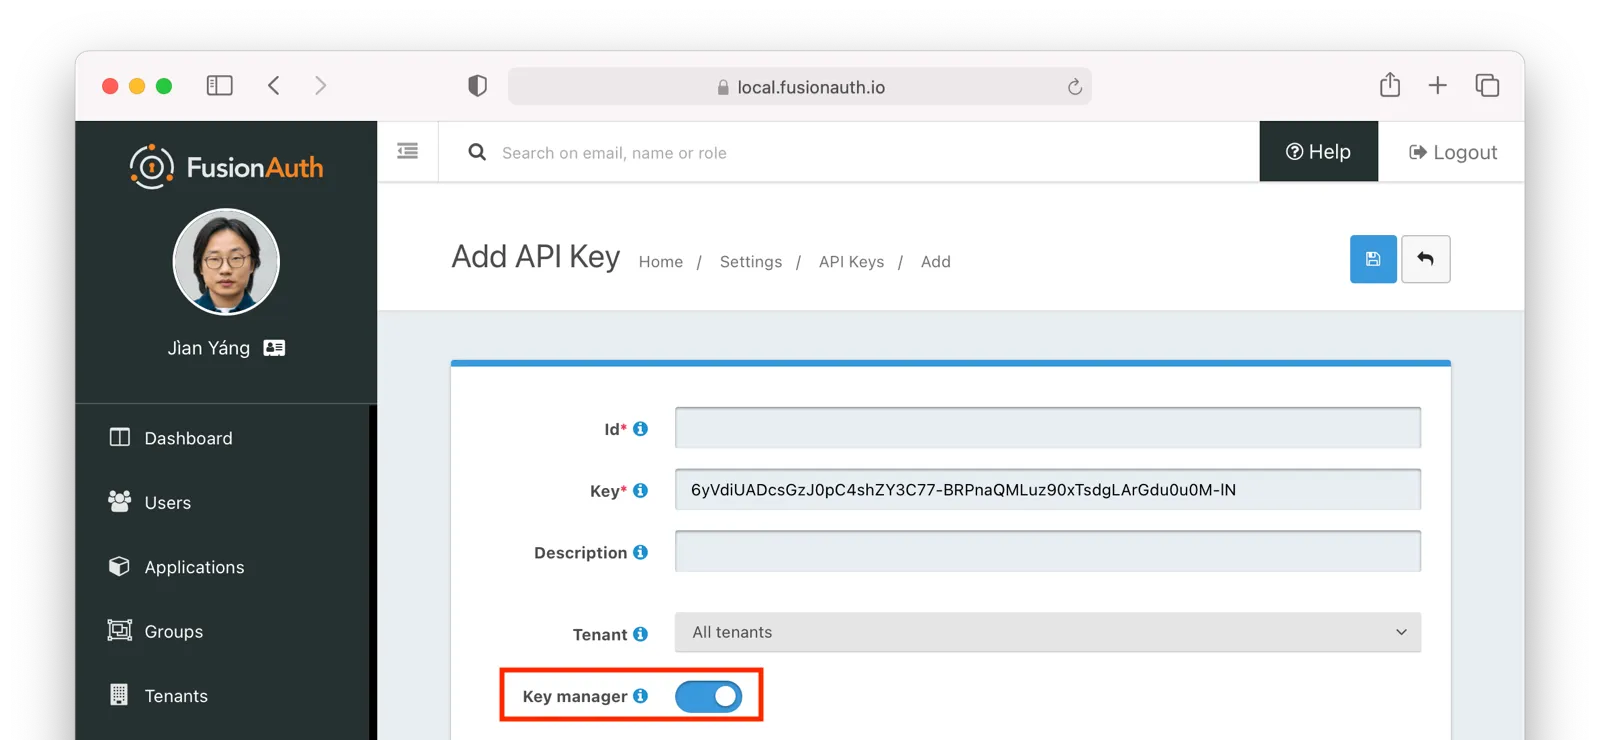
3. Copy and Securely Store Your API Key
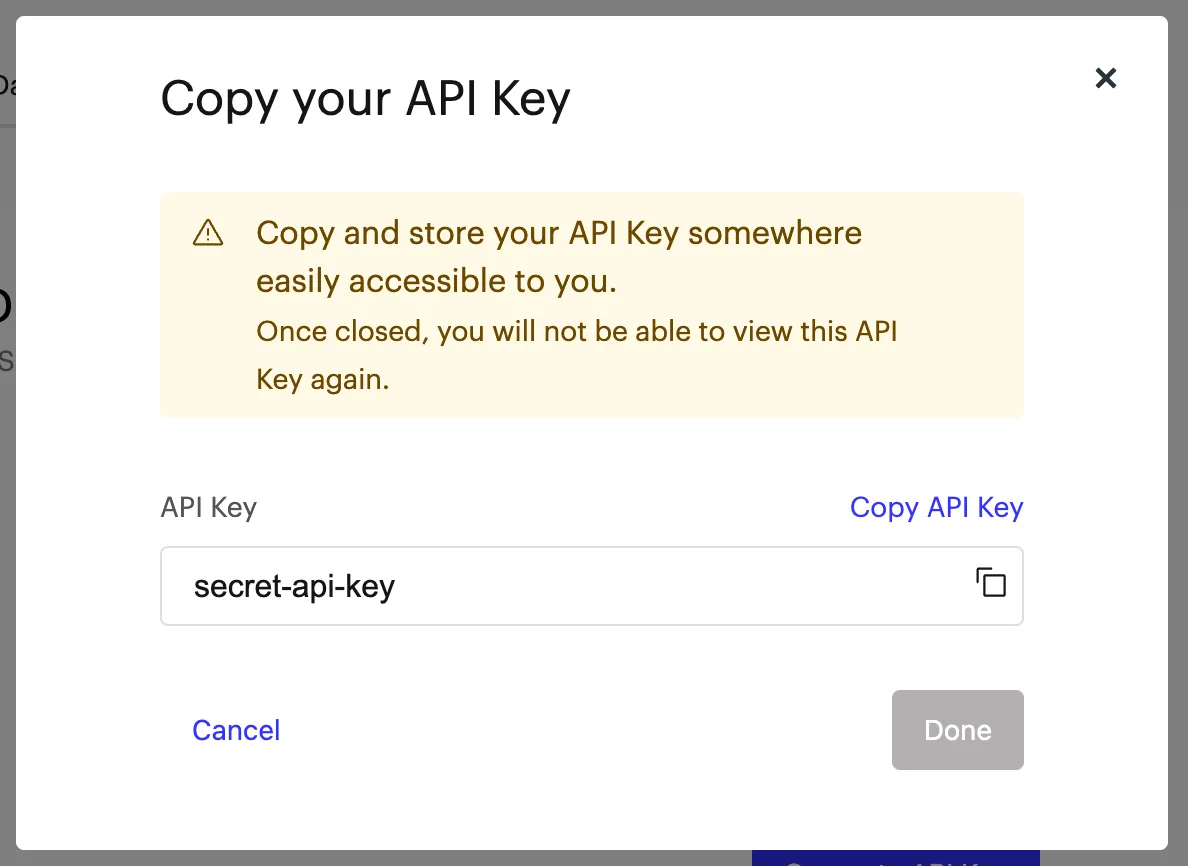
After you create the key, copy it once and save it safely. You cannot view the full key again.
- Store it in a secure password vault.
- Never paste it into public code.
- Keep backup records in a safe place.
For example, if you lose the key, you’ll need to create a new one. Saving it properly saves time and prevents errors later. This also helps deliver reliable smtp email without disruption.
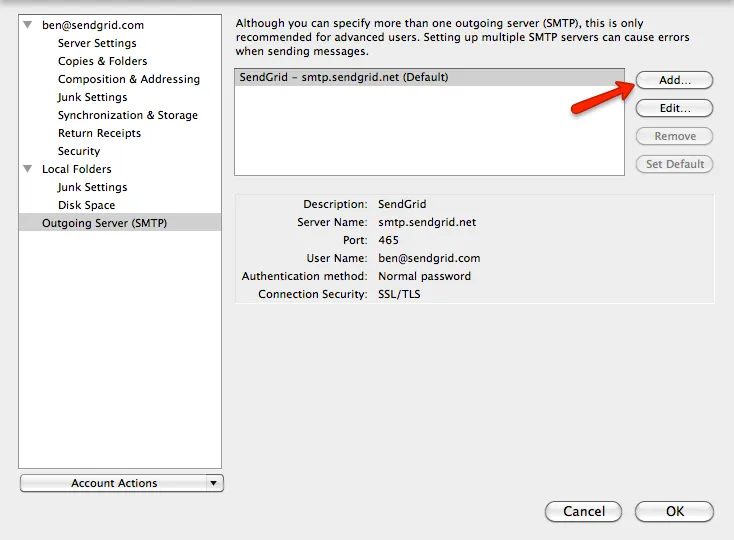
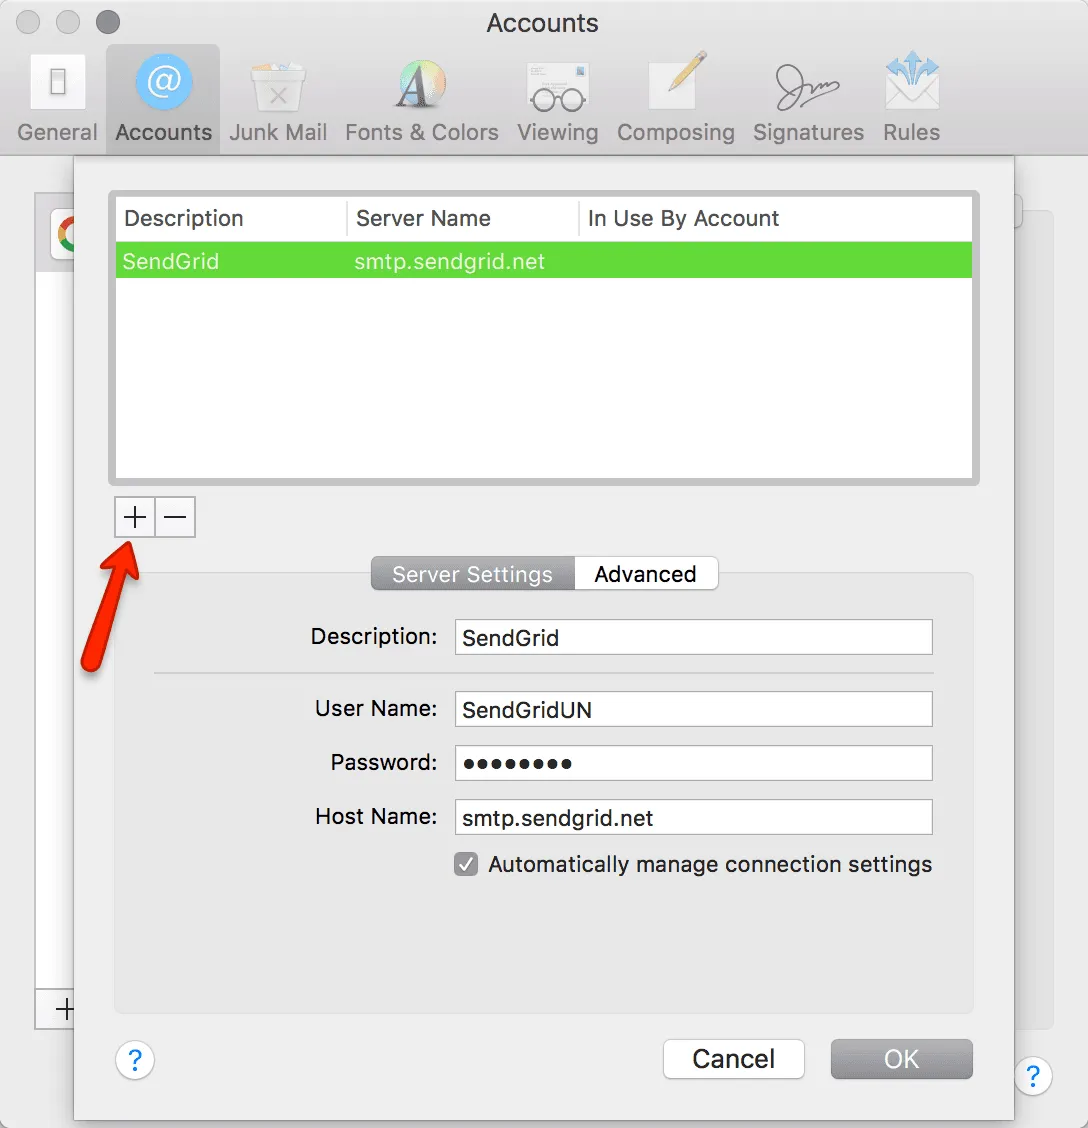
4. Open Your Application or Mail Client’s SMTP Server Settings
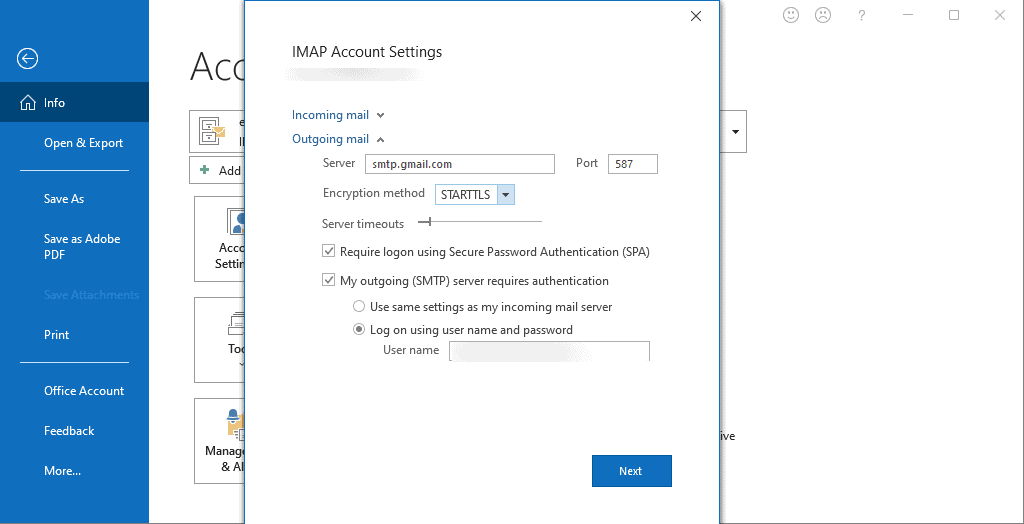
Now open the email client or program you want to connect. Each one has its own place for smtp service details.
- Go to account or mail settings.
- Find the section for outgoing smtp server.
- Paste your new key when asked for login.
For example, in Gmail or Outlook, this option is under “Outgoing mail.” Make sure you use the correct client settings to connect and send email.
5. Enter the Host: smtp.sendgrid.net
Every smtp service needs a mail server address. For SendGrid, the host is always the same.
- Type smtp.sendgrid.net in the host field.
- Make sure there are no spelling errors.
- Save the details in your client.
If you enter the wrong address, you will get a connection error. Always verify and test after saving. This ensures messages can be sent without issues.
6. Choose the Correct Port (587, 2525, or 465)
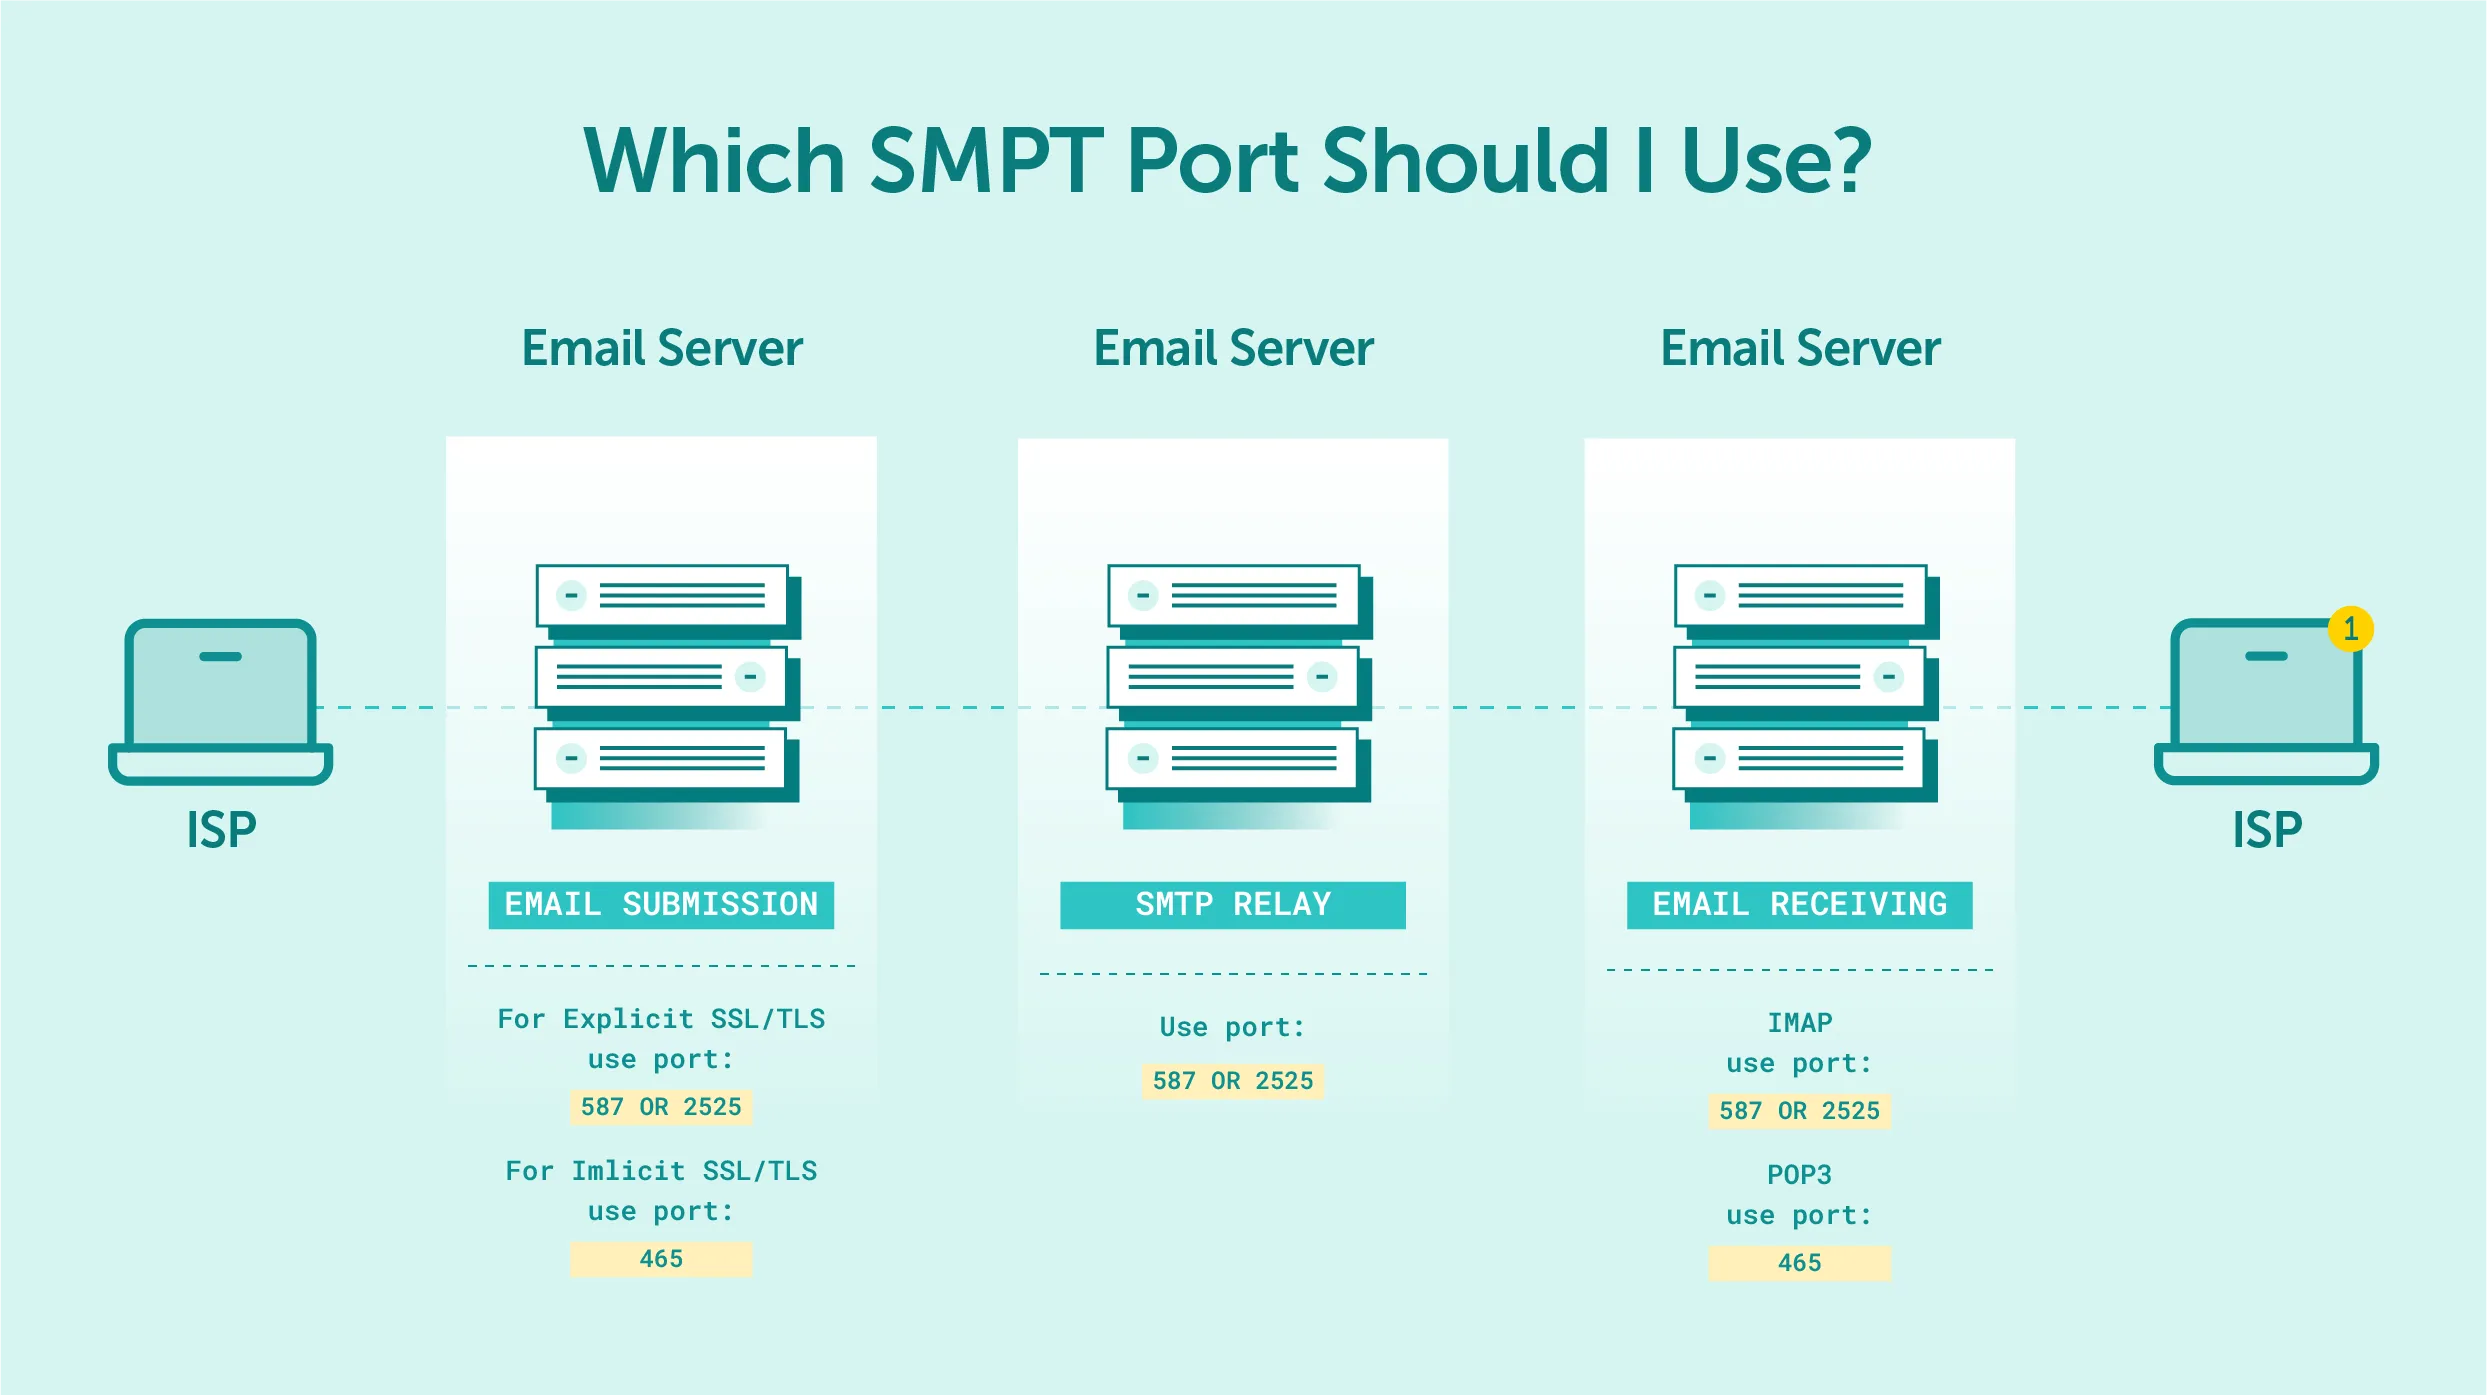
Ports are like doors used to connect to the smtp mail service. Picking the right one avoids blocks.
- Use port 587 (most common).
- Use 2525 if 587 is blocked.
- Use 465 for SSL secure connections.
Example: some networks block port 25, so using 587 helps deliver email. Testing different ports ensures your messages connect.
7. Set the Username to API key and Password to Your API Key
SendGrid uses a special login method. Your username is always “apikey” and the password is your created key.
- In username field: type apikey.
- In password field: paste your SendGrid API key.
- Save these login settings.
This method is safer than basic authentication with only username and password. It makes sure only verified apps and servers can send email.
8. Save Settings and Send a Test Email
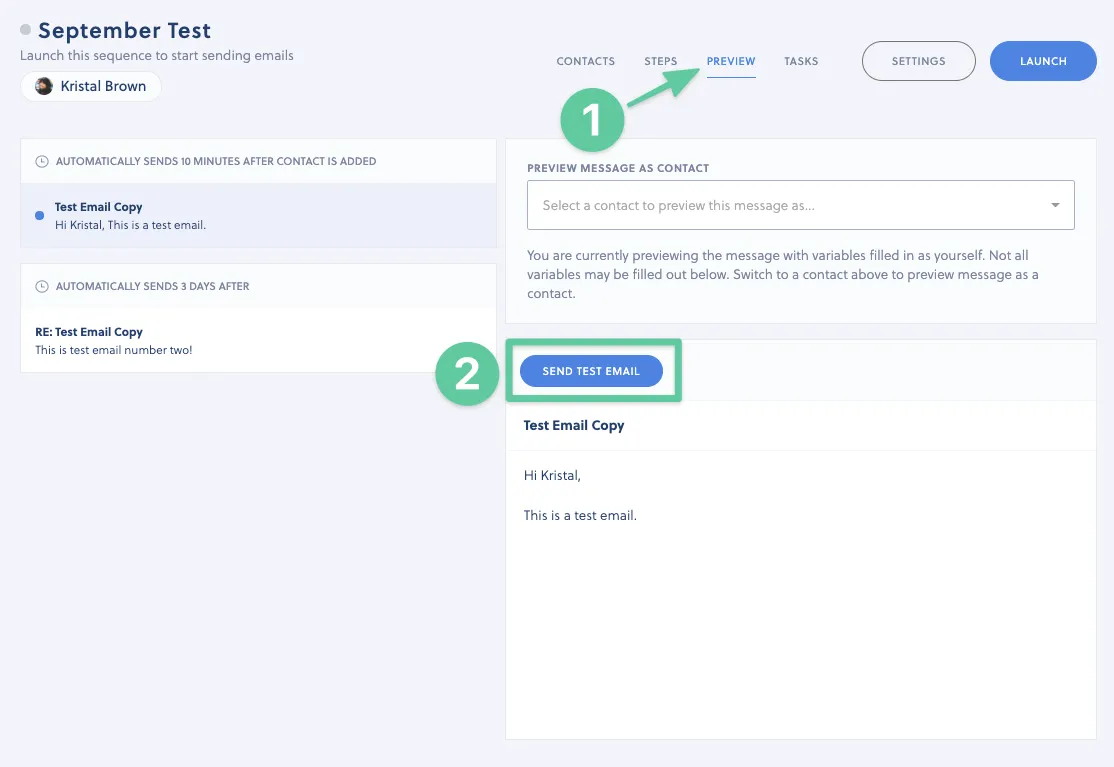
After you enter all details, save them and send a test email. This step helps verify connection.
- Save the configuration in your email client.
- Compose a short test message.
- Send it to your own inbox.
If the email arrives, you know your smtp email setup works. If not, check logs for error and adjust settings. Testing saves time before you send larger campaigns.
9. Verify Deliverability with Domain Authentication (SPF/DKIM)
Adding domain authentication improves trust and helps your emails land in the inbox.
- Add SPF and DKIM records in your DNS.
- Verify them inside your SendGrid account.
- Authenticate your sending domain to build trust.
Example: without this, spam filters may block your messages. With authentication, servers can verify the sender, addresses, and email header details. This step is vital for email deliverability.
10. Monitor Logs and Event Webhooks for Errors or Bounces
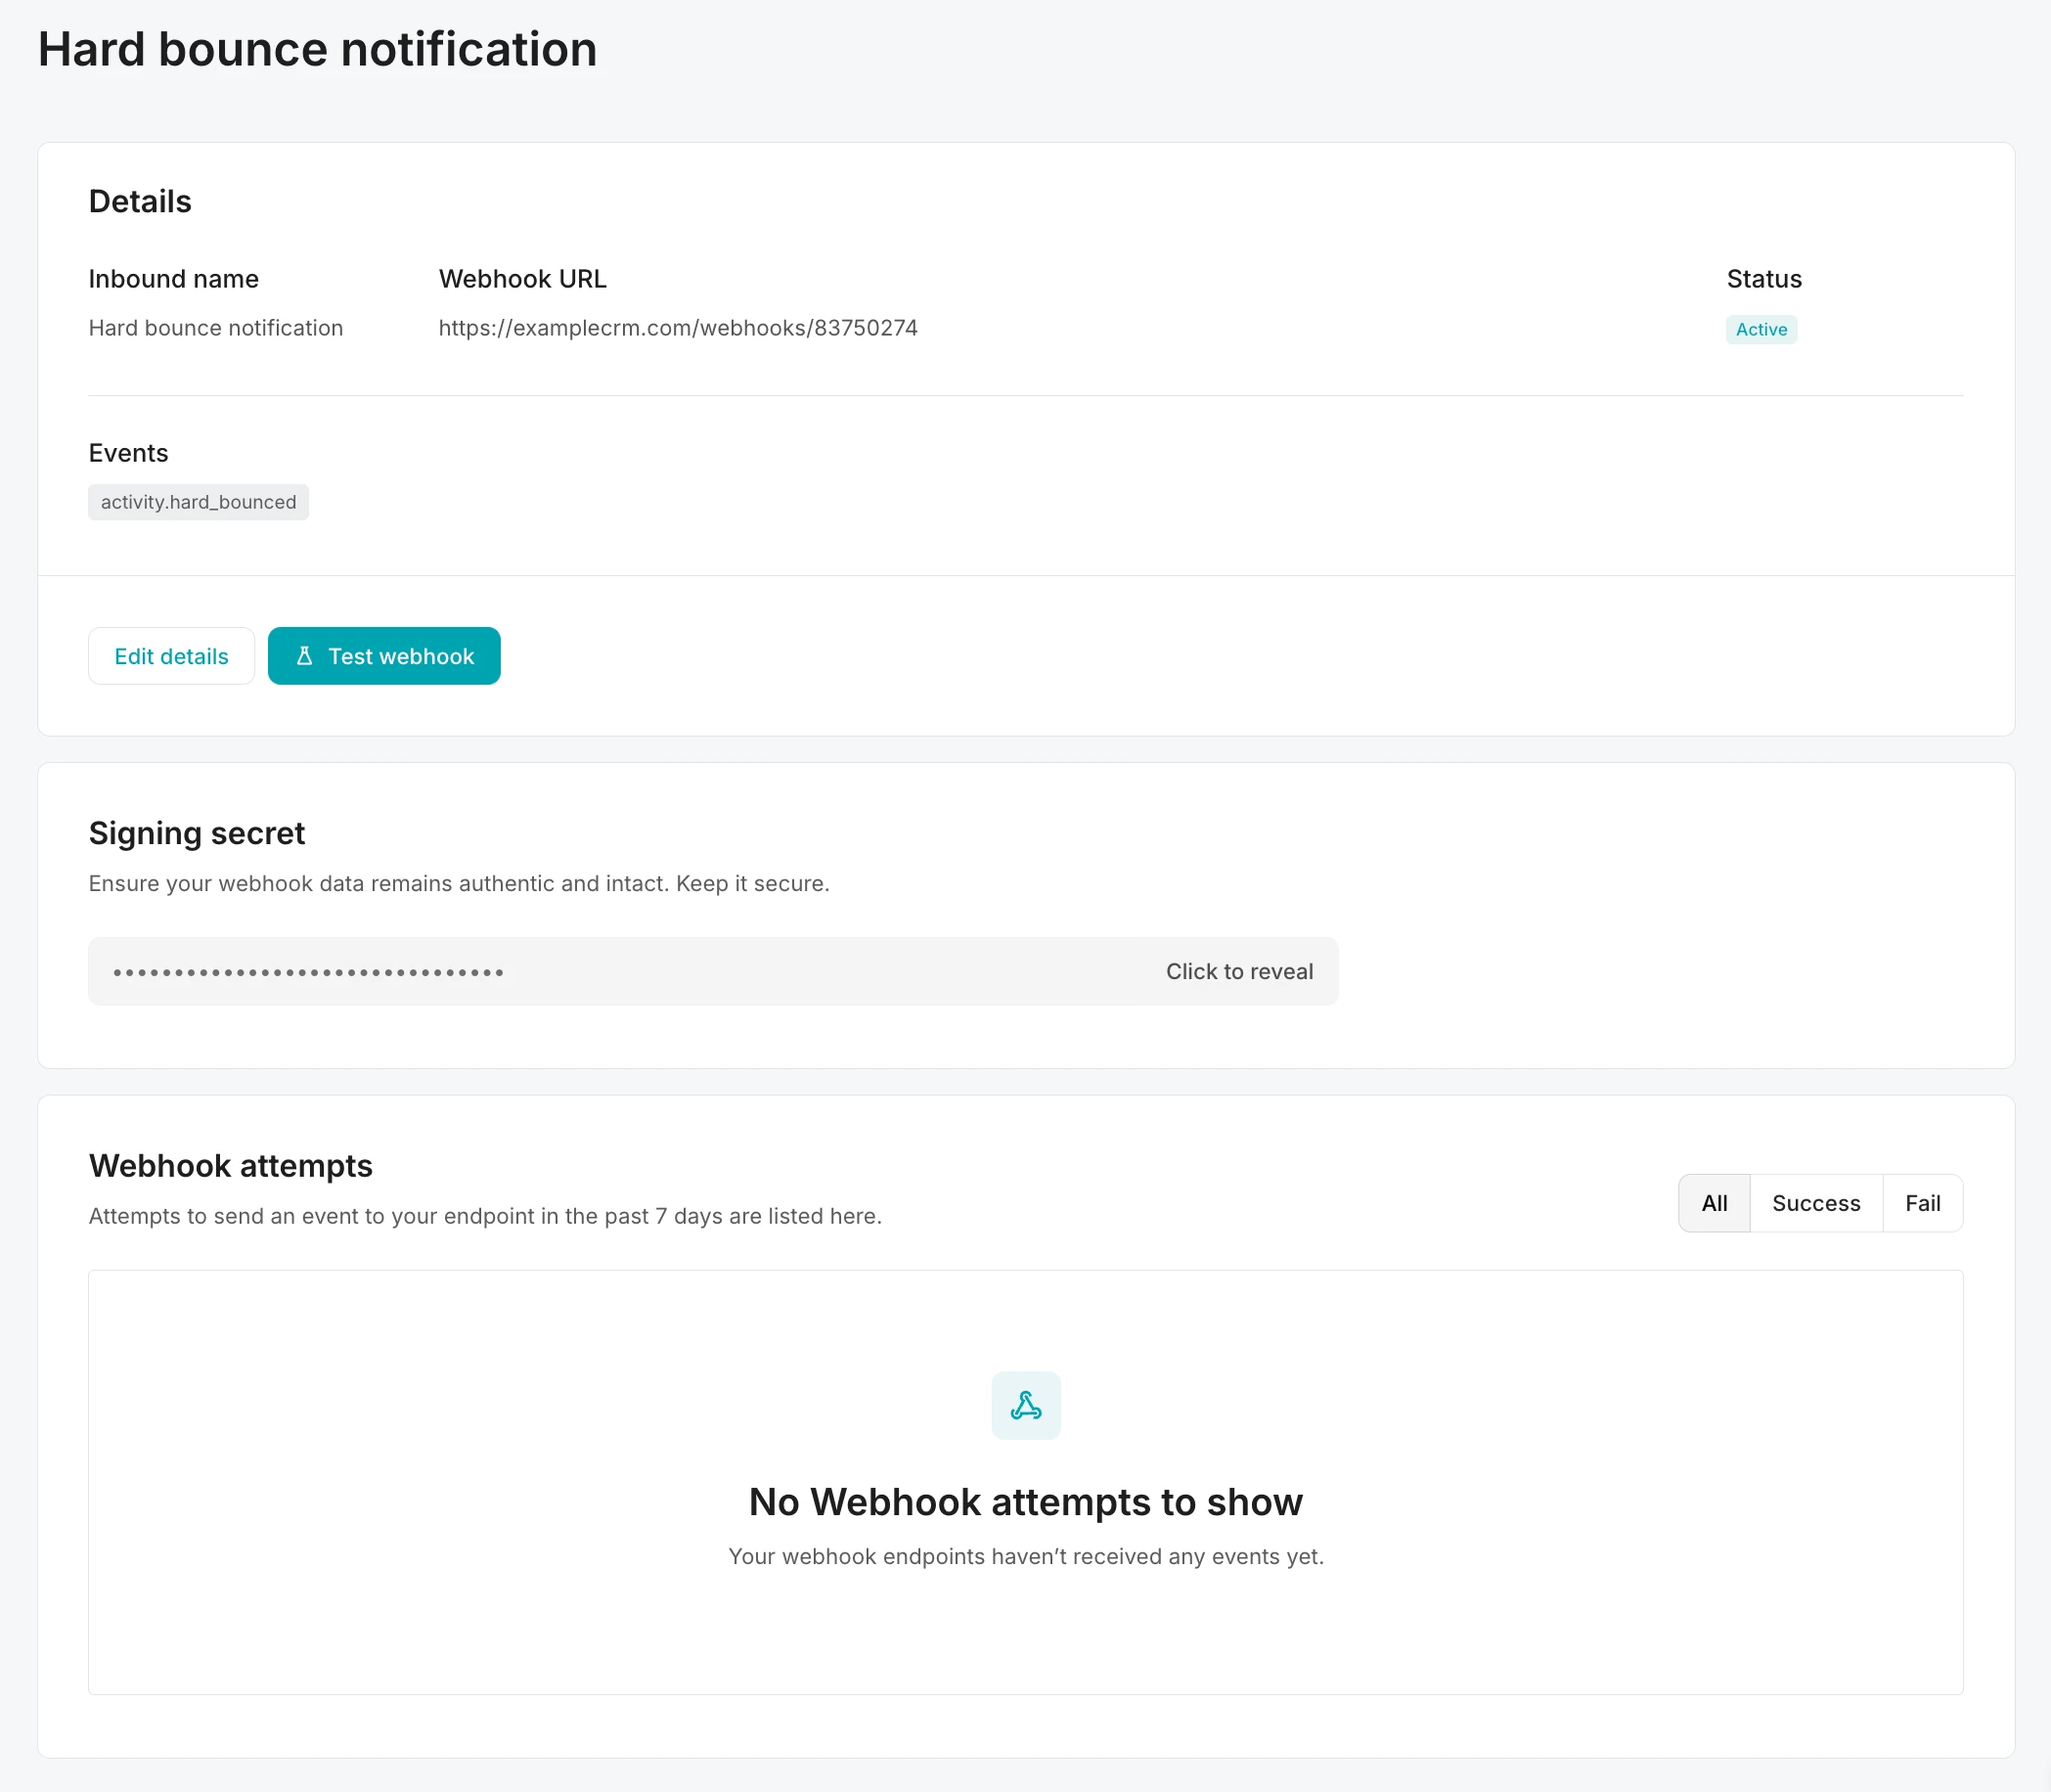
The last step is to track results. SendGrid gives you logs and events to monitor email delivery.
- Check logs for failed messages.
- Use webhooks to get data on bounces.
- Verify that recipients receive emails.
For example, if addresses are wrong, you’ll see errors in the log. Monitoring helps you fix issues fast. Keeping an eye on details ensures your article helpful and your business messages always deliver.
8 Common SMTP Server Mistakes You Should Avoid

When setting up smtp servers, even small errors can cause email delivery issues. Knowing the common mistakes helps you fix problems early and keep your mail flowing smoothly.
1. Using the Wrong Port for Your SMTP Server
Ports are like doors for your connection. If you use the wrong one, your smtp email may fail or get blocked.
- Use port 587 for TLS connections.
- Try 2525 if 587 is blocked by your provider.
- Use 465 if you need SSL.
For example, many networks block port 25, which stops mail from sending. Always test email with different ports to verify the right path. Using the correct port helps deliver messages without error and improves email deliverability.
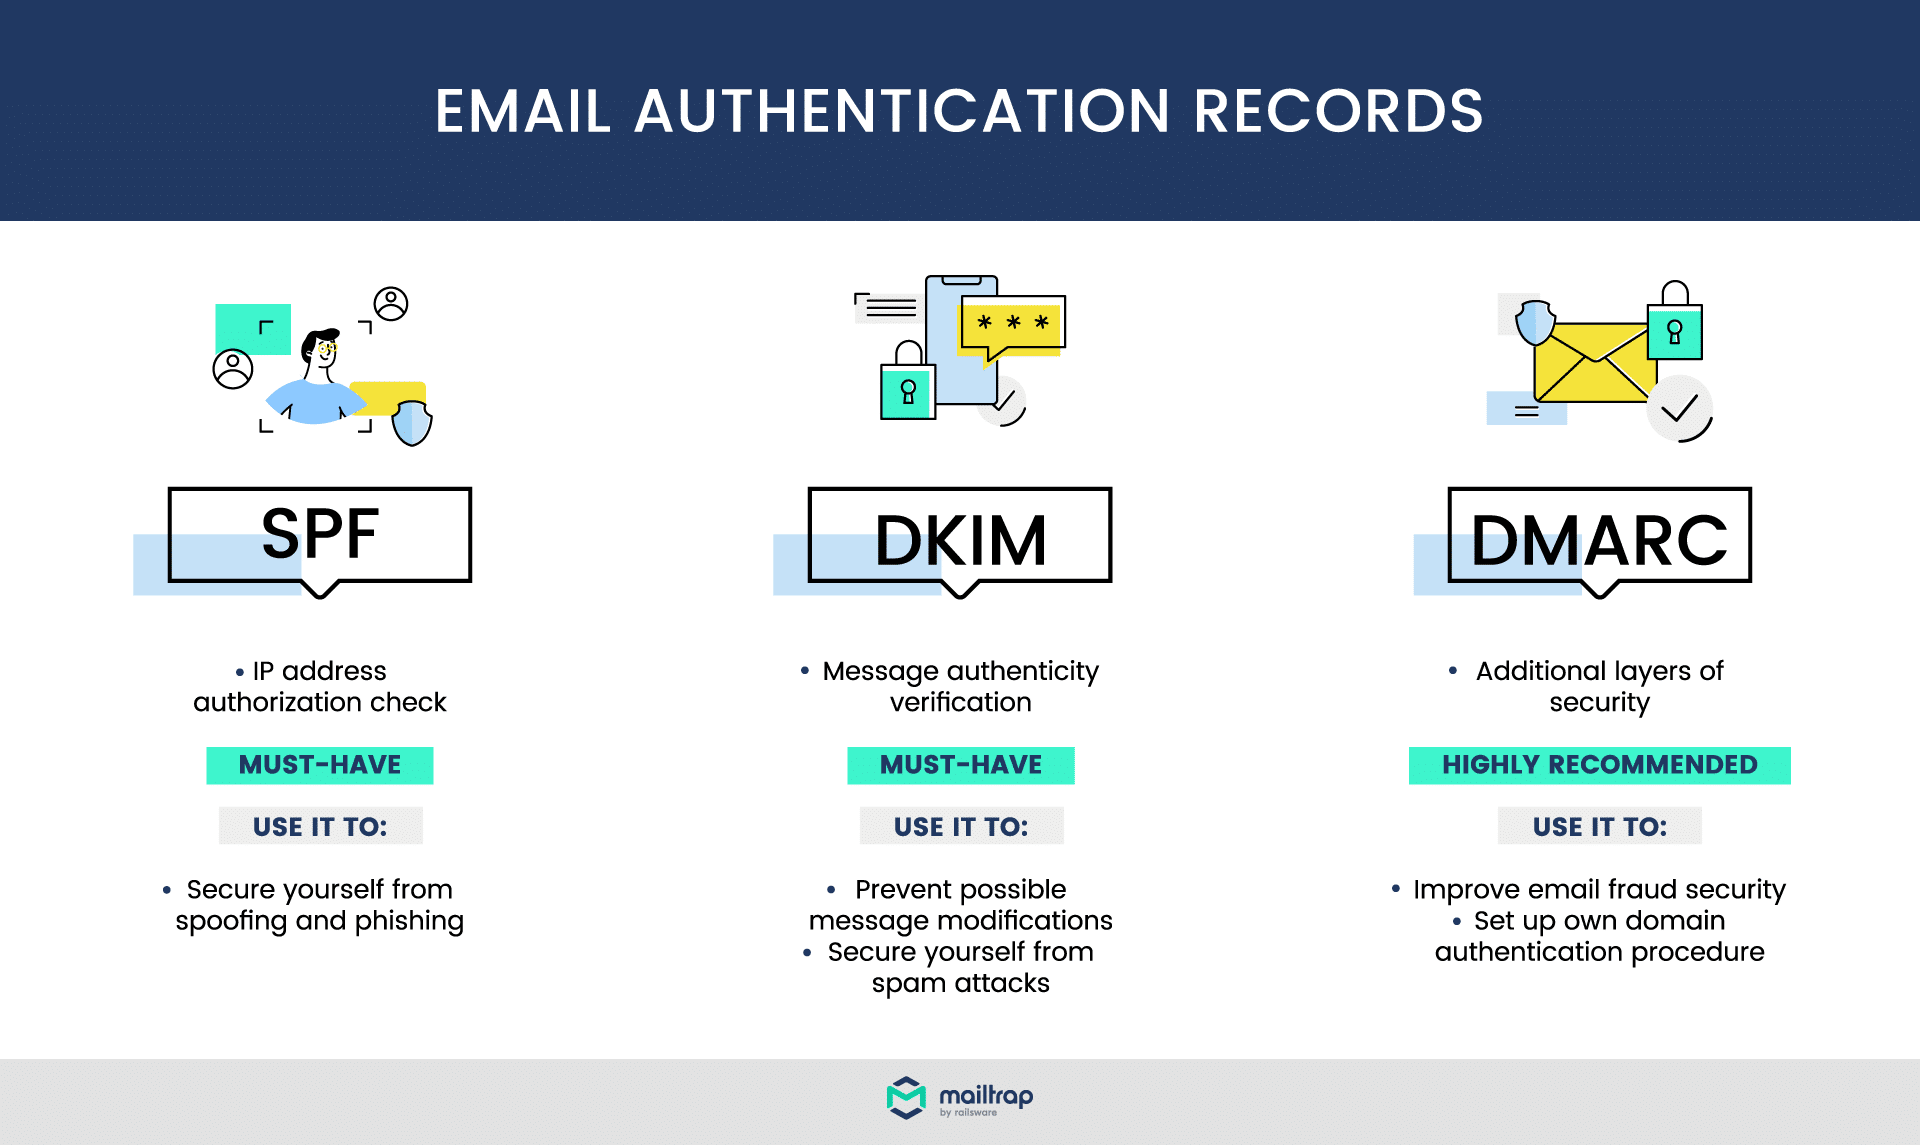
2. Forgetting to Authenticate Your Domain (SPF/DKIM/DMARC)
Without authentication, providers cannot trust your sending domain. This makes your messages look unsafe.
- Add SPF and DKIM records in your DNS.
- Set up DMARC for more control.
- Verify these inside your SendGrid account.
For example, if you send email without domain authentication, spam filters may block or mark your mail. When you authenticate, addresses and email headers match, which builds trust. This saves time and helps your article helpful for users.
3. Confusing Username and Password (Using Login Instead of API Key)
Many users mix up login details when setting smtp service. SendGrid does not use your normal account login.
- Username should always be apikey.
- Password must be your SendGrid API key.
- Never use your account email and password here.
For example, if you type your login address and password, the connection fails. By using an API key, you create secure access and reduce risk. This keeps your settings clean and makes sure your messages deliver.
4. Hardcoding IP Addresses Instead of Using SendGrid’s SMTP Relay
Hardcoding IP addresses may seem simple, but it often breaks when providers change them. SendGrid’s smtp relay is more stable.
- Always connect to smtp.sendgrid.net.
- Avoid putting one server IP in your client.
- Use the relay to route messages safely.
For example, if Twilio SendGrid’s IP pool changes, your hardcoded address stops working. Using the smtp relay saves time, reduces errors, and helps deliver mail to the inbox.
5. Sending From a Free Email Domain (like Gmail/Yahoo) Without Authentication
If you use Gmail or Yahoo without sender authentication, your messages look fake to filters.
- Use your own sending domain.
- Add proper DNS authentication.
- Verify inside your SendGrid account.
For example, sending from Gmail without checks may lead to blocks. By creating and authenticating your own domain, you improve email deliverability and trust with email service providers.
6. Ignoring Throttling Limits and Hitting SendGrid’s Rate Caps
SendGrid sets limits to protect their servers. If you send too fast, your emails may get delayed or dropped.
- Know your account’s rate caps.
- Spread messages across time.
- Use logs to monitor sending speed.
For example, sending 10,000 messages in one push may cause error. By creating batches, you deliver mail without hitting caps. This keeps your business emails flowing smoothly.
7. Overlooking Bounce, Block, or Spam Reports in SendGrid Logs
If you don’t check logs, you may miss problems with addresses or delivery.
- Look at bounce and block reports.
- Track spam filter feedback.
- Fix errors before they grow.
For example, if many addresses are wrong, you’ll see them in logs. By acting fast, you save time and improve email delivery. Monitoring makes your article helpful and guides users to better results.
8. Not Rotating or Securing Your API Keys Properly
API keys are powerful. If you don’t protect them, you risk leaks.
- Rotate keys often.
- Store them in a safe place.
- Give only the needed permissions.
For example, if you paste your key in public code, anyone could use it. By creating limited keys with the right permissions, you protect your mail service. This builds trust and makes sure your smtp email setup stays secure.
Conclusion
You’ve made it all the way through, which means you’re serious about getting your email setup right. That already puts you ahead of many users who stop halfway and keep facing the same delivery problems.
The next step is to put this knowledge into action. Don’t wait for the “perfect moment” to configure things — small steps taken today can save you hours of frustration later.
Think of your email system as the voice of your brand. The clearer and more consistent that voice is, the stronger your connection with your audience becomes. So take what you’ve learned, apply it with confidence, and keep refining as you grow.